
An OpenThread Quest: My IPv6 Border Router

This is the first post on what I expect to be a long and successful list. Yes, let me dream, I know that it will be challenging.
So, let's start with my agenda: I like open standards, and I have grown to hate ZigBee and WiFi protocols for home automation. WiFi is not really a suitable protocol for home automation --too many wifi devices will degrade your home network, and battery powered devices really dislike this high-consumption protocol. ZigBee... is a good idea, but all the ecosystem around it seems to be built on royalties, manfucaturer specific implementations, closed hubs, and (lots of) reverse engineering. Moreover, the DIY scene for ZigBee doesn't look to good in my experience.
Thread is a protocol that seems suitable for home automation, and OpenThread is an open implementation that seems to be quite robust. You can check it at https://openthread.io/.
If you want something immediately usable with no tinkering, stop reading. If you like my agenda, my opinions and/or want to dip your toes in OpenThread DIY, then you may enjoy this series. (Yes! I'm calling it a series even before I start my first entry! Sue me!).
Embracing IPv6
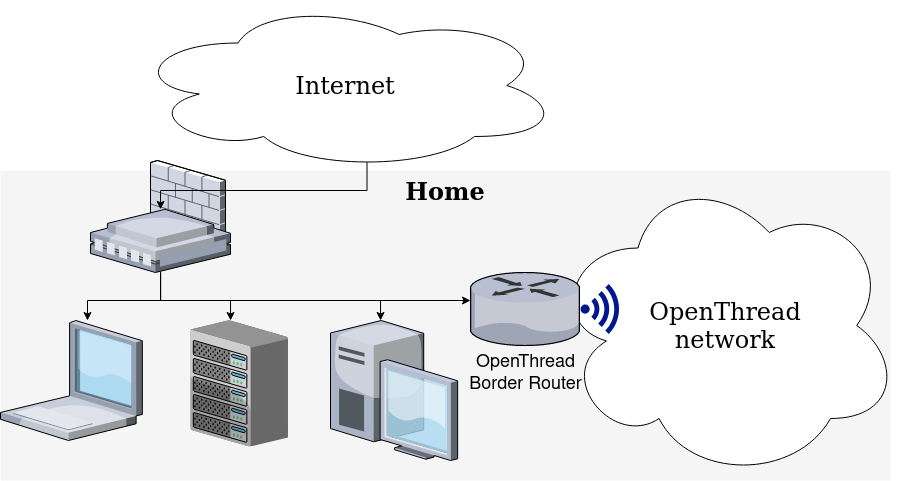
Thread networks will typically have a Border Router, which is a router that connects the thread devices with your LAN. There is a guide here: https://openthread.io/guides/border-router but it's very focused on giving you a MVP that is IPv4 compatible. I have IPv6 at home and I want everything to be IPv6 native. And I want to use my LAN network. That's what I will be talking about in this blog entry.
Get a Thread Dongle
The fundamental thing that you need in a OpenThread border router is Thread connectivity. You need something similar to this makerdiary product or this chinese equivalent USB. Any nRF52840 board with USB should be adequate. No affiliation links here, nor any kind of personal review; I am just giving away some pointers.
You will need to flash an appropriate firmware. See this entry from the future for more information on how to get started with the dongle.
Preparing the Raspberry Pi
Get a Raspberry Pi. Get a MicroSD card. Write a Raspberry Pi OS Lite onto the card. Configure the SSH (and remember, if you are using WiFi, to configure that too). Plug everything. Connect to the Raspberry Pi and perform all the sudo raspi-config first-time config.
Ready? Let's start with the tricky stuff.
Basic IPv6 foundation
In my experience, you should get an IPv6 addresses out of the box. Let's say that the Raspberry has the IP 2001:db8:100::42 (being 2001:db8:100::/64 your LAN range). I will also assume that 2001:db8:200::/64 is a range you control where you will build your OpenThread network. If you don't have an assignment bigger than /64 then you must do things differently, and I really don't know how to do it. I am myself using Hurricane Electric free Tunnel Broker IPv6 service and I have a /48 so that's what I am using.
Because later on we will end up installing (indirectly) the network-manager package, let's be proactive and install it now:
$ sudo apt install network-manager
$ sudo apt purge openresolv dhcpcd5You will need to set the managed flag in the /etc/NetworkManager/NetworkManager.conf as this shows:
[ifupdown]
managed=true
If you are using SLAAC: then you want some kind of static IP on the raspberry, and the easiest way is to use hardware-based addresses. This is achieved with the following command:
$ nmcli con show
# Default name is "Wired connection 1". Ugly name indeed
$ sudo nmcli con mod "Wired connection 1" ipv6.addr-gen-mode eui64
That command changes the configuration and after next reboot the IPv6 of the Raspberry will be a deterministic one --the IP won't change unless the Raspberry is substituted.
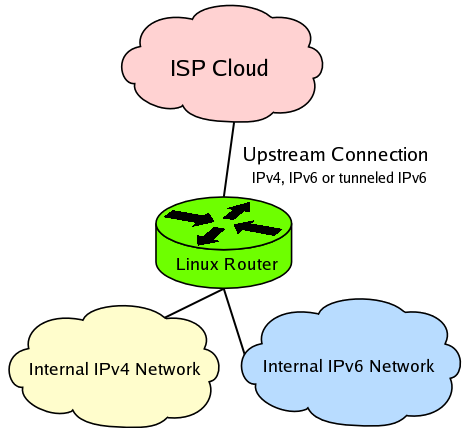
Look mum, I'm a router
net.ipv6.conf.all.forwarding=1Well, that was anticlimactic. But basically, a router is a thing that forwards packets and that is achieved with that flag. You must put it in the /etc/sysctl.conf file. If you don't want to reboot, you can also run sysctl -w net.ipv6.conf.all.forwarding=1.
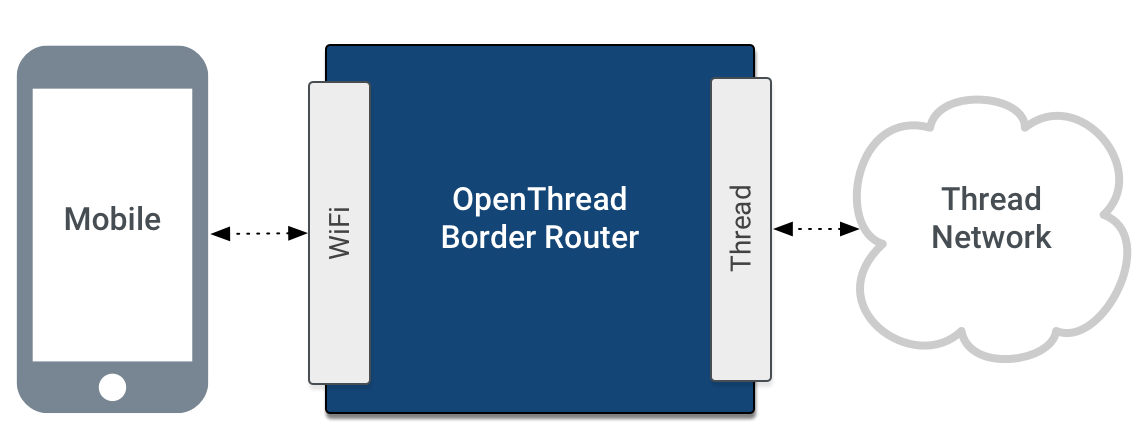
Look mum, I'm a Border Router
We will be using the opensource implementation of the border router provided by OpenThread, available in GitHub. The guide is available in the OpenThread website. That documentation focus on a certain configuration principles: build an Access Point at the Raspberry Pi with IPv6<->IPv4 tunneling. If that's ok, then you can ignore this blog entry and go there. But if you are ok with my IPv6 maximalist approach, keep reading.
Install git and become root; you can leave source code in /root if that's ok for you.
$ git clone https://github.com/openthread/ot-br-posix
$ cd ot-br-posix
$ export NAT64=0
$ export DNS64=0
$ export DHCPV6_PD=0
$ export NETWORK_MANAGER=0
$ export BACKBONE_ROUTER=0
$ ./script/bootstrap
$ ./script/setupThe last command will be running for a while --specially if you are using old Raspberry Pi models. Note that we are disabling the NETWORK_MANAGER because that configures the host Access Point mode, which we do not want. And the *64 features are needed if you plan to have IPv4 compatibility, but I am skipping that completely.
My dongle nRF52840 appears at /dev/ttyACM0 (check if that's your case). With that in mind, configure the otbr-agent by editing /etc/default/otbr-agent. Mine has:
OTBR_AGENT_OPTS="-I wpan0 spinel+hdlc+uart:///dev/ttyACM0"You can now reboot the Raspberry. You may be able to restart services instead but... it's easier and safer just to reboot again. If everything's good, you will now see a new network interface called wpan0 (you can see the interfaces by doing ip link). The web interface will be available at port 80, you can see it with any browser (e.g. http://[2001:db8:100::42]
If there's something missing, you can check the Verify services and Verify RCP steps from the official build guide.
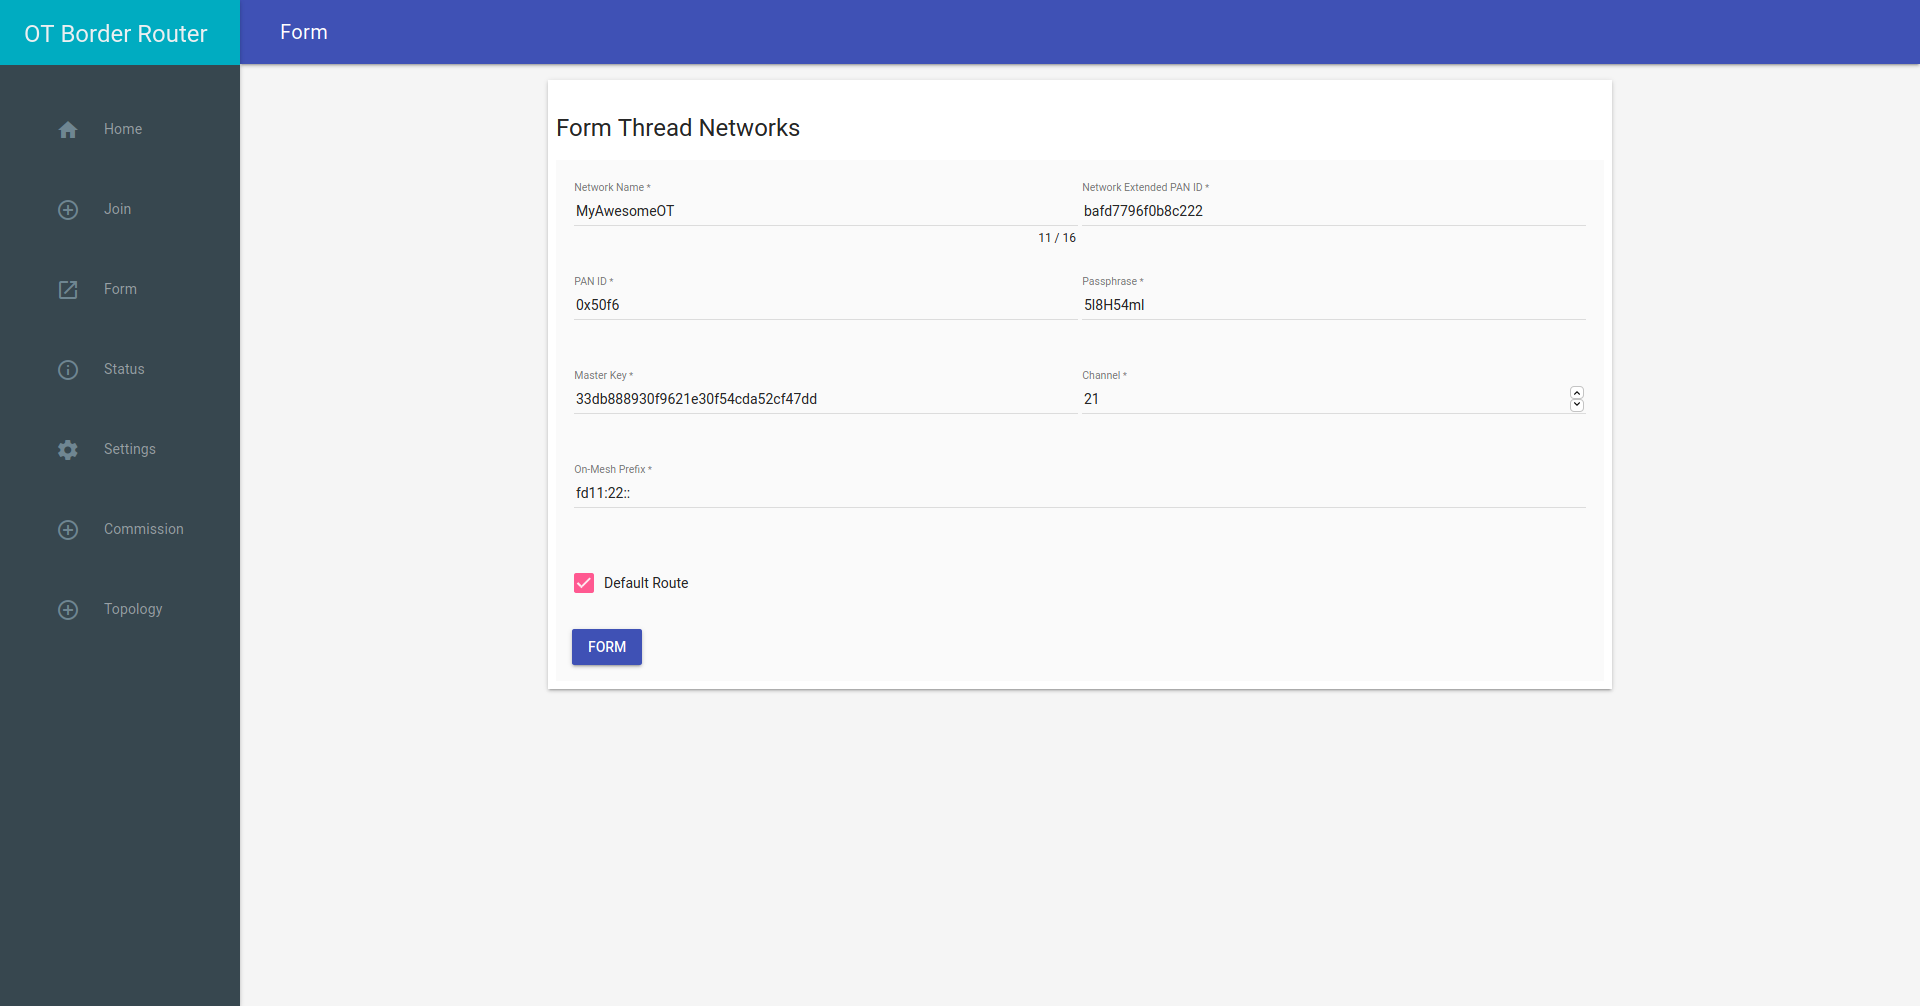
Once rebooted, the otbr-* services should be up and running and we can form an OpenThread network. This is done with the web interface, as explained here. It may look like this:
At this point you can start commissioning devices to this network, but we still lack some things. We need to address certain router advertisement capabilities at the Border Router. At the OpenThread level we need to configure the prefix for those public IPv6 addresses. We also need to add a route for the LAN IPv6 prefix. Those things can be done as follows:
$ ot-ctl prefix add 2001:db8:200::/64 paros
$ ot-ctl route add 2001:db8:100::/64 s med
$ ot-ctl netdata registerAfter those commands, you will see that the wpan0 interface will have a valid IPv6 on the range 2001:db8:200::/64. However that configuration is ephemereal --the configuration is lost after a reboot. However... it seems that I'm not the first to stumble upon this. [Note: I have not participated in that thread. It's just a coincidence.]
My solution involves a systemd service file. Put the following in /etc/systemd/system/otbr-additionalprefix.service (remember to tweak to your prefix):
[Unit]
Description=Additional IPv6 prefix for the OpenThread stack
Requires=otbr-agent.service
After=otbr-agent.service

[Service]
Type=oneshot
# Awful workaround (keep reading)
ExecStart=sleep 120
# End of awful workaround
ExecStart=ot-ctl prefix add 2001:db8:200::/64 paros
ExecStart=ot-ctl route add 2001:db8:100::/64 s med
ExecStart=ot-ctl netdata register
# The following is optional; it gives an iconic IP
# to the BR (in the OpenThread network context)
ExecStart=ip a a 2001:db8:200::1 dev wpan0
## If your systemd supports `Restart` for oneshot services,
## then you can remove the sleep workaround and uncomment
## the following lines, which make more sense
#Restart=on-failure
#RestartSec=30

[Install]
WantedBy=multi-user.target
Alias=otbr-additionalprefix.service
Enable the service and restart the machine to check that it is working as intended. It will be working as intended when the wpan0 interface has a proper IP and the output of ot-ctl prefix shows your prefix.
Becoming a full-fledged IPv6 router
There is a key aspect of IPv6 way-of-doing-things that is Router Advertisement (commonly written RA). The border router needs to publicly state that it is a router and what ranges it is working. This will solve routability and also proper IP acquisition. I will be assuming that SLAAC is supported on the OT devices; it is the simplest way of getting hardware to have deterministic unique static IPs. Also keep in mind: several prior configuration steps also require SLAAC on the Thread devices --like the mesh-local prefix or the additional IPv6 prefix.
We will be using the radvd package (install it with apt-get). This is a sample configuration of /etc/radvd.conf:
interface wpan0
{
    # On this interface, we are publishing the prefix.
    # It is the canonical prefix for OpenThread devices.

    AdvSendAdvert on;

    MinRtrAdvInterval 5;
    MaxRtrAdvInterval 15;

    prefix 2001:db8:200::/64
    {
        AdvOnLink on;
        AdvAutonomous on;
    };
};

interface eth0
{
    # On this interface we are publishing ourselves
    # as the main routing option to access it.
    # I.e. we are saying that the OpenThread network
    # addresses are accessed through this border router.

    AdvSendAdvert on;

    MinRtrAdvInterval 5;
    MaxRtrAdvInterval 15;

    route 2001:db8:200::/64 {};
}
Restart the radvd daemon once you have a proper configuration file with systemctl restart radvd.service.
Making your other router play nice with its new friend
At this point, you should be able to ping Thread devices from within any machine in your LAN --i.e. try it from your laptop!
Things are working because radvd is doing its job and your desktop is getting the routes advertised by the radvd service. You can see those routes by doing ip -6 route (from the desktop). There will be a line that resembles this:
2001:db8:200::/64 via fe80::dead:beef:caffe:0042 dev enp11s0 proto ra metric 100 pref medium However, you may want to have the global IPs publicly addressables, and that means making your "internet router" behave properly. I have pfSense and I have observed that it doesn't like to follow RA given from within the LAN network, so I did some things:
- Add a new gateway. You can use the
fe80::IPv6 address of your Border Router machine, assuming that both routers are link-local between them. - Add a new static route. The prefix is the
2001:db8:200::/64and the gateway is the previous one. - Add some extra fireway rules; I like to allow outside ICMP traffic to IPv6 and you need to specify to pfSense that
2001:db8:200::/64is allowed in LAN.
Your mileage may vary.
References

 openthread
ot-ctl usage